

The safest way to handle chandelier packing is to cut power at the breaker, confirm the circuit is dead with a voltage tester, then photograph, disassemble, and individually wrap every crystal, arm, and bulb before boxing or crating. Small to mid-size fixtures often travel fine in hard plastic bins or double boxes for local moves. Large, antique, or multi-tier chandeliers usually need a custom crate and a professional crew.
TL;DR:
- Power must be shut off at the circuit breaker and confirmed with a voltage tester before disassembly begins to prevent electrical hazards.
- Photograph and document every detail of the chandelier, including wiring, hardware, and measurements, to ensure accurate reinstallation.
- Wrap each crystal individually in acid-free tissue and bubble wrap, and pack bulbs, shades, and arms separately with proper labeling to prevent damage.
- Use suspending internal-crate support for high-value or large fixtures to minimize stress and avoid cracks caused by lateral torsion during transit.
- For long-distance or high-value chandeliers, professional crating with custom suspension and careful handling significantly reduces the risk of damage.
Table of Contents
- What Does Safe Chandelier Packing Actually Require?
- How Do You Document a Chandelier Before Taking It Down?
- Taking It Down: Disassembly and Wiring Steps
- The Right Way to Pack Crystals, Bulbs, and Shades
- Protecting the Frame, Arms, and Finish
- Choosing the Right Container: Bins, Boxes, or Custom Crates
- Loading and Moving Day Handling
- Storing a Packed Chandelier the Right Way
- When Should You Hire a Professional for Chandelier Packing?
- Get Professional Chandelier Packing Support From Atlantic Star Relocations
- Sources
- FAQ
What Does Safe Chandelier Packing Actually Require?
Before anything else touches your chandelier, the power has to be off. Not just the wall switch. Go to the circuit breaker and shut down the specific breaker feeding that fixture, then confirm it with a non-contact voltage tester before you disconnect a single wire. This is not a step to eyeball. A wall switch can be wired to control only part of a circuit, and touching a live wire while standing on a ladder is exactly how minor moving jobs turn into emergency room visits. This Old House's guide to voltage testers walks through the correct technique, and it's worth watching once even if you've done electrical work before.
Once power is confirmed off, gather your team and gear. Chandeliers, especially larger ones, are almost never a one-person job. You need a second set of hands to support the fixture's weight while the first person works the mounting hardware loose.
Supplies to have on hand before you start:
- A sturdy ladder rated for the ceiling height, plus a helper to brace it
- Work gloves for handling metal arms and glass edges
- Bubble wrap and acid-free tissue paper for crystals and glass shades
- Microfiber cloths to avoid scratching plated or antique finishes
- Foam sleeves or pipe insulation for arms and rods
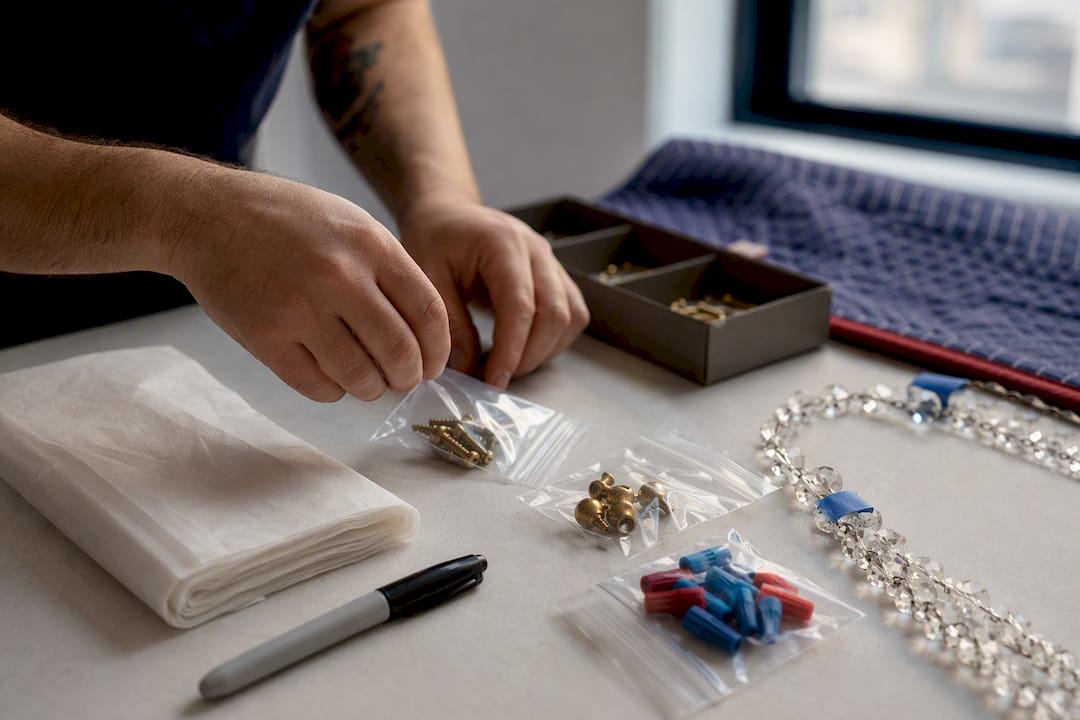
- Small, labeled zip bags for screws, finials, and connectors
- Hard plastic bins or sturdy double-wall boxes
- Moving blankets and packing tape
Pro Tip: Buy more bubble wrap than you think you'll need. Chandelier packing eats through wrap fast because every crystal and glass piece gets its own layer, and running out mid-disassembly means an incomplete, unstable pile of exposed glass sitting on your dining table overnight.
How Do You Document a Chandelier Before Taking It Down?
Photograph everything before you loosen a single screw. This single habit prevents more reassembly headaches than any other step in the process.
- Shoot the whole fixture from below and from an angle, capturing how the arms, tiers, and chain or rod connect to the ceiling mount.
- Photograph each tier separately if the chandelier has multiple levels, noting how crystals or strands hang and in what pattern.
- Close in on the wiring and hardware to record wire colors, connector types, and how the canopy attaches to the electrical box.
- Measure and write down chain length, rod length, and overall drop height, since these numbers matter if the new space has a different ceiling height.
Reversing these photos step by step during reinstallation is a standard technique among moving professionals for a reason. It turns a confusing pile of parts back into a working chandelier without guesswork.
Label as you go. Bag hardware by function rather than by tier ("mounting screws," "finials," "wire nuts") and mark each strand of crystals with its tier number using masking tape and a permanent marker.
Taking It Down: Disassembly and Wiring Steps
Support the chandelier's full weight before touching the mounting bolts. If you unscrew the canopy first without bracing the fixture, it drops the instant the last screw releases, and that's how arms bend, crystals shatter, and hands get pinned. One person holds the base steady, ideally standing on a second ladder, while the other works the hardware.
Only disconnect the wiring after you've verified the circuit is dead. Once confirmed, cap the exposed wire ends with wire nuts or electrical tape and bundle them loosely with a twist tie. Avoid tight zip ties that crease or kink the wire. Kinked wiring can crack insulation, which becomes an electrical hazard the next time the fixture goes up.
Work from the outside in. Remove bulbs first, then any detachable shades or glass diffusers, then crystal strands, then arms if the design allows arm removal. Each piece goes into a labeled bag or gets wrapped immediately, never left loose on a table where it can roll or get knocked off.
Order of operations that works for most standard fixtures:
- Bulbs out first, wrapped individually, never packed loose
- Glass shades or diffusers next, wrapped and boxed separately
- Crystal strands removed tier by tier and bagged by position
- Arms detached last, if the design permits, and immediately sleeved in foam
- Central frame and canopy wrapped in moving blankets once stripped down
Pro Tip: If your chandelier's arms don't detach, don't force them. Some fixtures are welded or riveted at the frame. Forcing a "detachable" arm that isn't meant to come off is one of the most common ways people accidentally snap a chandelier's structure during a move.
Keep every small part in a bag that goes into the same inner box as its matching component, not scattered across different containers. Losing a single finial or a set of matching wire nuts is a small thing that turns into a frustrating scavenger hunt on move-in day.
The Right Way to Pack Crystals, Bulbs, and Shades
Crystals are almost always the most time-consuming part of chandelier packing, and rushing this step is where most damage happens. Wrap each crystal individually in acid-free tissue paper, then add a layer of bubble wrap around that. Skipping the tissue layer and going straight to bubble wrap can leave faint pressure marks on polished crystal over long transit times or storage, since the plastic wrap sits directly against the surface. This layered approach for individually wrapping crystals is standard practice among professional movers, and it holds up whether you're packing for a move across town or into long-term storage.
Once wrapped, group crystals by tier and place them into small, compartmented boxes or a plastic bin with foam dividers. Compartments matter more than box size here. A crystal rattling loose inside a big box, even a well-padded one, will eventually find its way against another hard surface.
Bulbs need their own separate treatment entirely:
- Use divided bulb boxes or foam sleeves designed for lightbulb shipping
- Never pack bulbs in the same compartment as crystals or glass shades
- Stand bulbs upright when the box design allows it
- Cushion the base and tip, since these are the weakest points on most bulbs
Fine art and specialty shippers consistently recommend that bulbs and glass pieces travel in dividers or foam sleeves rather than loose together, and that guidance applies just as well to a chandelier coming down from a dining room ceiling as it does to gallery glasswork.
Label every box clearly with the tier number and position it represents. "Crystals, Tier 2, Front Left" tells your future self exactly where a piece belongs. Tape hardware bags directly to the inside wall of the box or crate they correspond to, so nothing gets separated during transport or a stint in storage. If you're packing shades, wrap them in bubble wrap first, then nest them in a box with foam corner protectors so no two shades touch directly.
Protecting the Frame, Arms, and Finish
Once the fragile pieces are off, the bare frame still needs serious protection. Wrap each arm individually in foam sleeving, then add a layer of moving blanket material secured with tape, applying that tape only to the blanket, never directly to the chandelier's finish. Adhesive residue on brass, gold leaf, or antique bronze can be nearly impossible to remove without damaging the plating underneath.
For fixtures with real value, whether that's a large crystal chandelier or a genuine antique, suspending the fixture inside a crate using an internal cross baton beats laying it flat almost every time. A cross baton is a wooden support built inside the crate that holds the chandelier's frame from above, letting it hang the way it would from a ceiling rather than resting its weight on delicate arms. Professional packers use this method because suspending the fixture internally reduces the structural stress that comes from arms bearing weight they weren't designed to support horizontally. Laying a multi-tier chandelier flat, even padded, creates torsion between the central frame and the arms, and that twisting is what causes cracks at the joints months after a move, long after anyone would think to blame the packing.
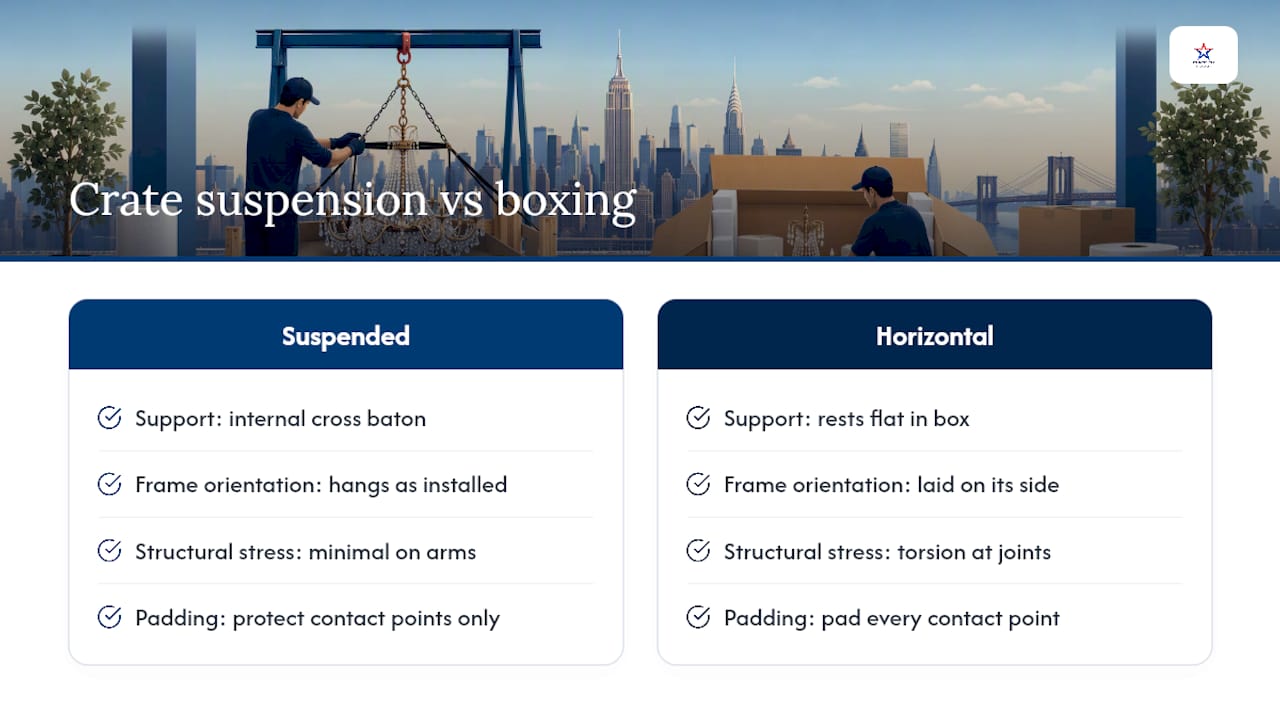
If a crate with internal suspension isn't available and boxing horizontally is the only option, immobilize the fixture completely. Every point where the frame or arms touch the box wall needs padding, and there should be zero space for the fixture to shift when the box tilts.
Pro Tip: Never let two metal or crystal surfaces touch directly inside a box, even briefly. Padding between every contact point is what actually prevents the fine scratches that show up under lighting months after the move, long after anyone remembers packing day.
Choosing the Right Container: Bins, Boxes, or Custom Crates
Container choice comes down to fixture value, size, and how far it's traveling.
- Hard plastic bins work well for smaller, sturdier fixtures moving locally, since they resist crushing better than cardboard.
- Double-boxing, an inner box nested inside a slightly larger outer box with foam or paper filling the gap, adds real shock absorption for a modest cost increase.
- Custom wooden crates with internal suspension are the standard for long-distance moves, high-value antiques, or anything with a complicated multi-tier design.
Double-boxing with foam partitions is genuinely a cost-effective strategy for local moves where a full custom crate would be overkill. But the moment a chandelier has to survive a multi-state truck route or air freight, wooden crates and professional packing become the recommended approach, while packing-only options stay reasonable for shorter trips.
What drives custom crating costs: fixture size and weight, labor hours for on-site measurement and build, materials (plywood, internal hardware, foam), and whether the crate needs specialized suspension engineering for an oversized or asymmetrical design. Fixtures shipped internationally may also need crates that meet ISPM-15 wood treatment standards, though that's mainly a concern for cross-border freight rather than most moves within the United States.
Published pricing for custom crating and professional chandelier packing commonly falls between several hundred and multiple thousands of dollars, depending heavily on how large and intricate the fixture is.
Loading and Moving Day Handling
A perfectly packed chandelier can still get wrecked by careless loading. Crates and boxes need clear "This Side Up" labeling and, more importantly, a crew that actually respects it.
- Keep suspended crates upright at all times; tipping one lets the fixture swing inside, which can bend arms or strain wiring connections
- Block and strap every crate or box so it can't shift during transit, using moving blankets as buffers against the truck wall
- Never stack anything on top of a chandelier crate or box, regardless of how sturdy the container looks
- Load chandelier containers last, near the truck's rear ramp, so they're first off and handled with fresh attention rather than crew fatigue
On arrival, inspect before you start unpacking. Check the exterior of the crate or box for crush marks, water exposure, or shifted contents. Unpack carefully and methodically, working in the reverse order of how you packed, and photograph any damage immediately before moving or discarding packing materials. Documentation at delivery matters just as much as it did on packing day, especially if you need to file a claim.
Storing a Packed Chandelier the Right Way
If the chandelier isn't going straight into a new home, storage conditions matter as much as the packing itself. Humidity swings are the real enemy here, causing metal components to tarnish and wood crate joints to loosen over time.
- Choose climate-controlled storage over a garage, basement, or unconditioned unit whenever possible
- If the crate was built for suspension, keep it hanging inside the crate rather than laying the fixture down
- Stand boxed components upright with solid padding underneath if hanging storage isn't an option
- Check on stored chandeliers every two to three months, watching for moisture, pest activity, or shifted packing material
- Add desiccant packs to control humidity inside sealed containers, and address pest control proactively rather than after finding damage
That two-to-three-month check-in isn't excessive. It's the standard interval recommended for stored fixtures precisely because slow damage from moisture or pests is much easier to catch early than to fix later. Before reinstalling anything that's been in storage for months, give it a gentle re-clean. Dust and residue accumulate even inside sealed boxes.
When Should You Hire a Professional for Chandelier Packing?
Large multi-tier fixtures, genuine antiques, and anything traveling long distance are the three situations where doing it yourself stops making sense. A crystal chandelier with delicate soldered joints, an antique with irreplaceable parts, or a fixture that has to survive a cross-country freight route benefits from someone who builds crates for a living.
Complicated building access changes the math too. A chandelier coming down from a 20-foot foyer ceiling in a Westchester County colonial, or navigating a tight stairwell in a Manhattan prewar building, adds risk that a two-person DIY job often isn't equipped to handle safely.
Expect custom crating and managed packing services to commonly start in the mid-hundreds of dollars for smaller jobs, climbing into the thousands for large or high-value fixtures that need bespoke suspension engineering. Atlantic Star Relocations approaches these jobs the way most valuable, oversized items deserve: an on-site assessment first, vendor-neutral coordination of the actual crating and packing work, climate-controlled storage arranged when timing doesn't line up perfectly, and reinstallation scheduling handled as part of the same project rather than an afterthought.
— Admin
Get Professional Chandelier Packing Support From Atlantic Star Relocations
Atlantic Star Relocations gives Westchester County, NYC, and tri-state homeowners something a general moving crew usually can't: a single point of accountability for the entire chandelier packing process, from the initial walk-through to custom crating to final reinstallation at the new address.

If you're relocating a home with a chandelier worth protecting, whether it's heading across Westchester, into Manhattan, out to Connecticut or New Jersey, or down to Florida, request an on-site assessment before packing day. Have the fixture's approximate size, tier count, and rough age on hand, along with any known fragile spots or prior repairs. That information lets the coordination team scope the right container solution, whether that's a padded double box for a short local move or a suspended custom crate for long-distance moving. Atlantic Star also handles the packing-only services some homeowners want when they're managing the rest of the move themselves, plus climate-controlled storage for chandeliers that need a temporary home during a renovation. Request a quote and get a real assessment on the calendar before the ladder comes out.
Sources
For hands-on technique, see SpareFoot's chandelier packing and storage guide, Fine Art Shippers' chandelier shipping tips, and ChandelierInstallation's custom crating overview. For electrical safety, watch This Old House's voltage tester demonstration. Collectors moving other oversized fragile pieces may also find risk-first shipping guidance for large sculptures useful for parallel crating principles.
- How to Move a Chandelier Safely: Packing and Storage Tips (SpareFoot)
- Chandelier removal, transport & custom crating (ChandelierInstallation)
- Tips for Packing and Shipping a Chandelier (Fine Art Shippers)
- How to use a voltage tester (This Old House video)
FAQ
How Do You Package a Chandelier for Moving?
Cut power and verify with a voltage tester, photograph the fixture, disassemble it piece by piece, individually wrap crystals and bulbs, then pack everything into hard bins, double boxes, or a suspended custom crate depending on value and distance.
What Chandelier Styles Are Considered Outdated?
Heavy brass finishes with ornate scrollwork and oversized traditional crystal designs have fallen out of favor in most current interior trends, with homeowners increasingly favoring simpler, mixed-metal, or linear fixtures.
How Do I Update an Outdated Chandelier Without Replacing It?
Spray-painting or professionally refinishing the metal frame, swapping ornate crystals for simpler glass or metal accents, and switching to a warmer bulb style can modernize an older chandelier without a full replacement.
What Is the Best Way to Store a Chandelier?
Store it in a climate-controlled space, keep it hanging inside its custom crate if one was built for suspension, and inspect it every two to three months for moisture or pest issues.
Should I Hire a Professional for Chandelier Packing?
Large, antique, or multi-tier chandeliers, plus any long-distance move or difficult building access, usually justify hiring professionals like Atlantic Star Relocations, who can assess the fixture on-site and arrange custom crating and coordinated logistics.